
View and Manage Remit-to Information
Provide remit-to information to meet compliance regulations when invoicing.
Introduction
Remit-to addresses ensure global electronic invoice compliance. To meet compliance regulations for most countries outside of the US, an invoice must include a remit-to address and associated tax information. If you want to do business with a customer who enabled compliant invoicing, you need to provide the necessary information.
Coupa considers the security and privacy of your bank account to be one of the most serious commitments and responsibilities we undertake to ensure your success. When you create a remit-to with bank account details, it represents secured settings to connect with and make payments to your bank account. Coupa Pay securely and seamlessly connects you and your customers with our global payments partner, who is licensed and regulated to provide payments and financial services around the world. Your data is protected by physical, logical, and software security controls and is protected both in transit and in storage with 256-bit encryption. Coupa does not store your payment account information but instead directs batch payments to and from your anonymized and encrypted accounts that you specify for payment. All payments are tracked and recorded to allow proper accounting and audit controls, and account numbers can only be unencrypted and displayed to provide audit validation only by appropriately authorized and authenticated users.
When you set up your account to be able to handle electronic invoicing, you need to set up a legal entity, which includes at least one remit-to address. This article explains creating a remit-to address separate from the legal entity process. For more information about legal entities, see Set up Legal Entities.
View remit-to accounts
Go to Setup > Admin > Remit-To to view the list of remit-to accounts and their details: associated remit-to address and legal entity, payment type, the customers they are shared with, and possible actions (update, share, and disable).
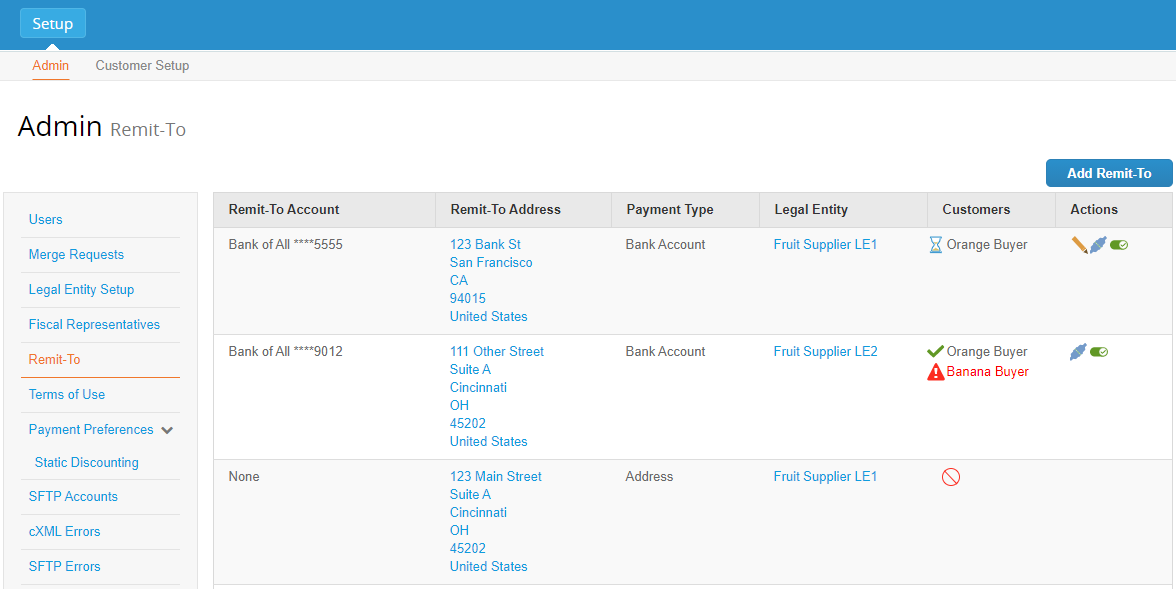
| Column | Description |
|---|---|
| Remit-To Account |
The type of remit-to address:
|
| Remit-To Address | The remit-to address. |
| Payment Type |
The payment type included in the remit-to:
|
| Legal Entity |
The legal entity the the remit-to address is associated with. Note
If you don't see any options in the dropdown menu, create a legal entity first. For more information, see Set Up Legal Entities. |
| Customers |
The customers you've shared this remit-to address with (up to five are displayed). The icons indicate the remit-to status with the customer they appear next to:
|
| Actions |
You can manage your remit-tos using the following actions:
|
 ): The remit-to address is active and approved by your Coupa customer in their instance.
 ): The remit-to address is active but is pending confirmation in your Coupa customer's instance.
 ): The remit-to address is inactive.
 ): Something happened and you need to contact Coupa support.
 ): Lets you add and remove the customers who use this remit-to address. You can add customers in the Add Additional Customers section or remove customers by clicking Delete (
 ) in the customer rows.
 ): Disables the remit-to address and deactivates it on legal entities it was associated with.
Add a remit-to
You can also add a remit-to when you create or edit a legal entity. For more information, see Set Up Legal Entities.
If you enabled two-factor authentication for financial data, the CSP prompts you to authenticate. For more information, see Manage Two-Factor Authentication.
- Go to Setup > Admin > Remit-To.
- Select Add Remit-To.
- In the Add Remit-To window that appears, select the legal entity you want your remit-to associated with. If only one legal entity is active, it is selected by default and you cannot change it.
You need to have added at least one legal entity before adding a remit-to from the Remit-To page. You can also add a remit-to as part of legal entity setup. For more information, see Set Up Legal Entities.
- On the Add a new Remit-To account page, complete the fields. For detailed descriptions of the fields, see see Set up Legal Entities.
Section Description What is your Remit-To Address? The address you receive payments at. You can add a new address or use a saved address, if you have existing remit-to addresses.
NoteIf you receive payments to a different location to where your business is registered, add the address here.
Payment Method You can select from the following options:
- Address: Select if you want to receive a physical check at the address you enter.
- Bank Account: Select if you want to get paid by bank deposit. If you select this option, sections for your bank account details, bank branch address, and remit-to contact appear.
- Virtual Card: Select if you want to get paid by virtual card. If you select this option, a section appears for your email address information. You can also allow credit card payments, which lets you connect your Stripe payment processing account to your CSP account.
Which customer can use this account? Select the customers you want to be able to use this remit-to account. - Select Save & Continue. The CSP displays the remit-to page you see during legal entity setup.
When you try to save a remit-to account with invalid fields, you can see an error message. You can decide to ignore the errors and save the account anyway. However, it is not recommended as it may result in delayed processing for the affected customers.
You can save an invalid remit-to account only once. Later you are required to correct the invalid fields.
- On the Add a new Remit-to account page that appears, choose whether you want to modify any existing remit-to accounts for the legal entity associated with the remit-to you just added.
- Select Next when you are done modifying existing remit-tos.
- On the following page, you can add new or manage existing ship from accounts.
- Select Done when you finished managing ship from accounts.
Deactivate a remit-to
- Go to Setup > Admin > Remit-To.
- In the Actions column, select Disable (
 ).
).
Deactivation cannot be undone. Deactivating a remit-to account also deactivates the corresponding supplier payment account on your Coupa Pay customer side.
If the remit-to you are deactivating is the only remit-to associated with the legal entity, you'll see a warning message that deactivating the remit-to will make the legal entity invalid. If choose to deactivate the remit-to, you'll need to assign another remit-to to that legal entity to continue to use it. For more information, see Set Up Legal Entities.
Update a remit-to
You can only update remit-to addresses that were saved with errors. Once you resolve the errors in a remit-to address and save it, you can't edit it again.
If you enabled two-factor authentication for financial data, the CSP prompts you to authenticate. For more information, see Manage Two-Factor Authentication.
- Go to Setup > Admin > Remit-To.
- Select Update (
 ) in the Actions column next to the remit-to you want to modify.
After you submit the updated remit-to information, a new remit-to account is created and the original account is deactivated.
Share a remit-to with a customer
- Go to Setup > Admin > Remit-To.
- In the Actions column, select Share (
 ).
). - On the Edit Remit-To Usage page that appears, select the customers you want to share the remit-to with from the Add Additional Customers dropdown list.
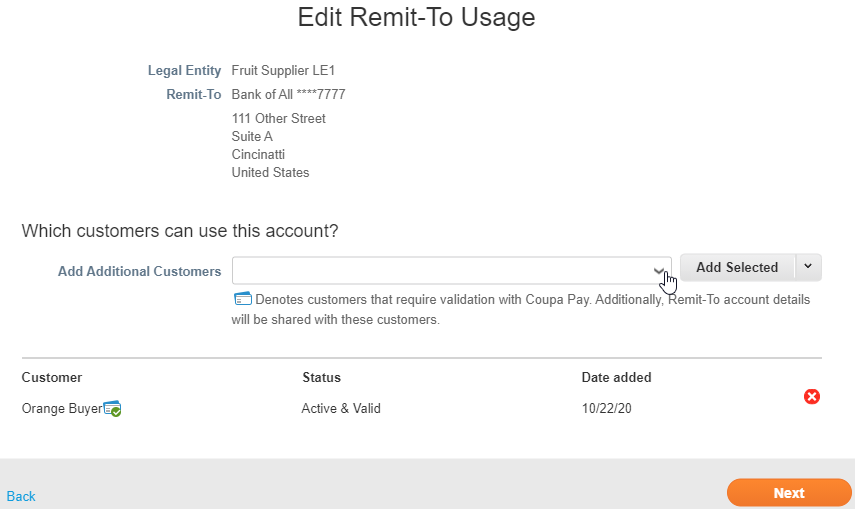
- Select Add Selected. To share it with all your customers, select Add All from the Add Selected drop-down.
If you merge CSP accounts, your remit-to addresses are not merged unless you make them available for all customers. Once the merge is complete, you can assign the remit-to address to the specific customer(s) again.
Add remit-to addresses to an Information Request form
Your customer might request you to add a remit-to address to your Information Requests. You can create a new remit-to address or choose an existing one from the legal entities.
You can see only those fields that your customer who sends the Information Request included in the form.
- Go to Profile > Information Requests. You can also access Information Requests by clicking links in notifications.
- Select your customer from the Profile dropdown menu. Any pending Information Requests appear on the page.
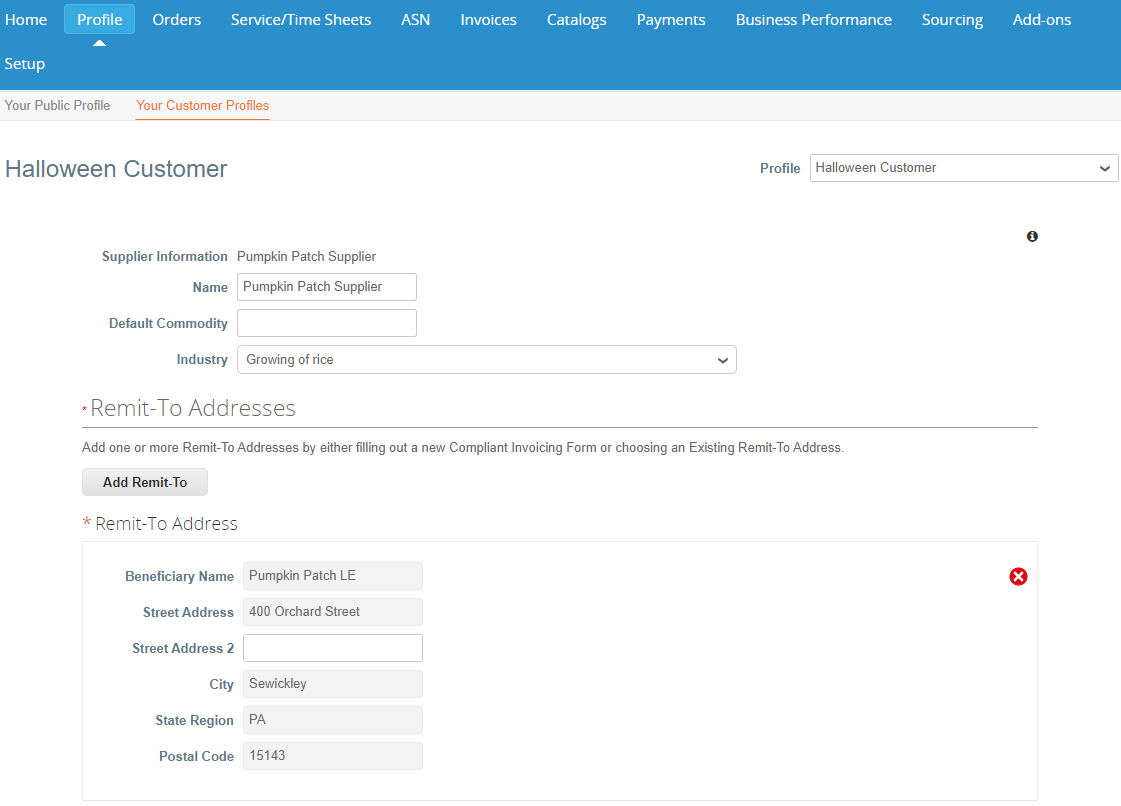
- If the Information Request includes Remit-To Addresses, select Add Remit-To to add a new or an existing remit-to address. You can add one or more remit-to addresses.
If you already provided remit-to information to your customer, the Remit-To Address fields are pre-populated based on the most recently used or created remit-to. If you added multiple remit-to addresses and your customer requests more remit-to addresses, all of them are pre-populated.
- In the Choose Remit-To Address window, you can select Choose next to the existing addresses you want to send to your customer or you can select Create New Remit-To Address to add a new address.
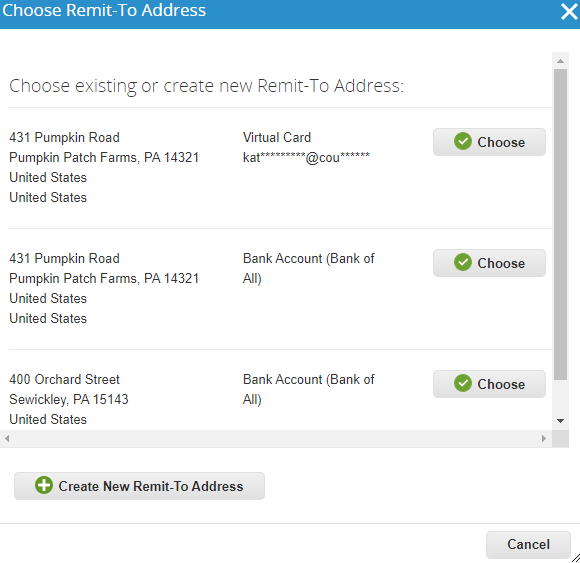
When you choose an existing remit-to address, the remit-to address fields are pre-populated onto the Information Request. Only bank fields and empty fields are editable. If you see invalid fields, update your remit-to address.
- Select Submit.
When adding a newly created remit-to address to an Information Request, you can decide to add it to your customer profile immediately or later on the Setup Complete page.
FAQ and Troubleshooting
Can I remove inactive remit-to accounts?
No, inactive remit-to accounts can't be removed.