
Set Up Legal Entities
Set up your account by adding legal entities to be able to create e-invoices.
Upgrade to Premium Support! Our team of dedicated experts is ready to provide you with priority assistance, personalized solutions, and rapid issue response.
A legal entity is a representation of your company and gives your Coupa customers the information they need to do business with you, including addresses, payment methods, and remit-to details.
You can receive payments through the CSP only if your customer(s) enabled Coupa Pay.
View legal entities
If you enabled two-factor authentication for financial data, the CSP prompts you to authenticate. For more information, see Manage Two-Factor Authentication.
- Go to Setup > Admin > Legal Entity Setup.
- Select Expand (
 ) next to the legal entity you want to see more information about.
- Review your legal entity information. Each legal entity has the following sections: Invoice From, Remit-To Accounts, Locations, Tax IDs and Customers.
Column Description Invoice From The Invoice From address you entered during setup. Remit-To Accounts The remit-to accounts associated with the legal entity. Remit-to accounts can be either Address, Bank Account, or Virtual Card. Locations Ship From addresses you entered during setup. Tax IDs The tax IDs associated with the legal entity. If you are located in the US, the CSP validates your tax ID to ensure it is compliant with IRS standards. You see a Valid  icon next to your tax ID when is has been verified. Verification can take some time.
Customers The customers that you've shared the legal entity with. Hover over the customers label to see the names of your customers.
Add a legal entity
If you enabled two-factor authentication for financial data, the CSP prompts you to authenticate. For more information, see Manage Two-Factor Authentication.
- Go to Setup > Admin > Legal Entity Setup and select Add Legal Entity in the top right corner.
- Enter the official name of your business that is registered with the local government and select the country/region where it is located and select Continue.
- On the Tell your customers about your organization page, complete the fields. For field descriptions, see Tell your customers about your organization fields.
- Select Save and Continue.
- On the Where do you want to receive payment? page, select how you'd like to be paid in the Payment Type selector.
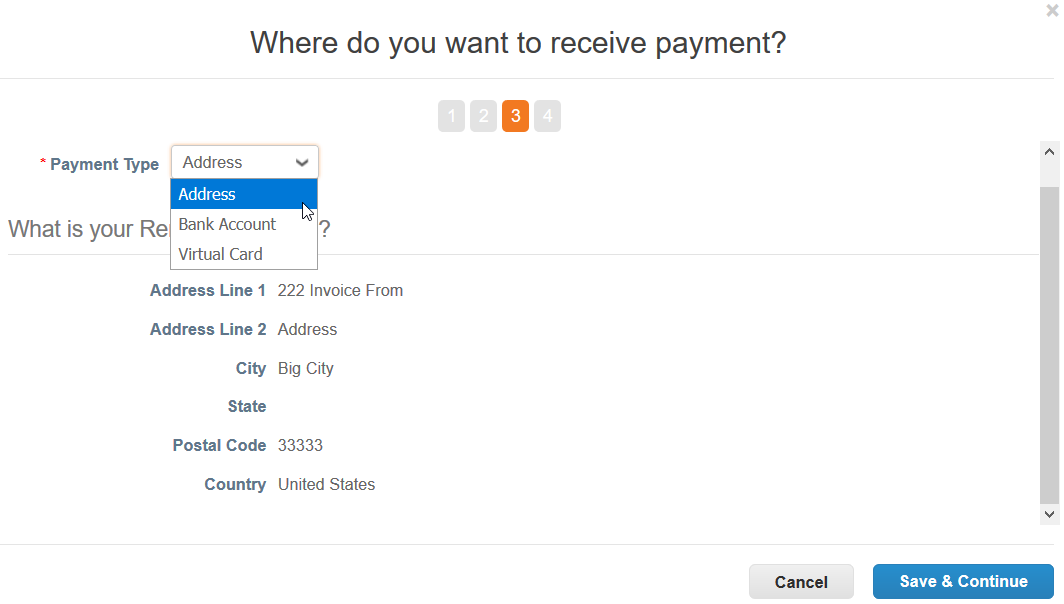
Payment Type Description Address You receive physical checks at the address listed. If you selected Use this address for Remit-to in step 3, the address is already entered.
If you didn't select this option, enter your remit-to address where you want payment mailed, your remit-to integration code, remit-to contact, and the Coupa customers who can use this remit-to account. For more information, see Tell your customers about your organization fields.
Bank Account You receive payment via deposit into your bank account. If you select this option, the bank account sections and fields appear. For more information, see Legal entity bank account fields.
NoteThe available bank account fields and field names depend on the selected country. Banking information is required for compliant invoicing in some countries when indicated. Otherwise, banking information is not required and remains private. For more information about account validations, see Supplier Remit-to Account Validations.
Virtual Card You receive payment via a virtual card sent to you through an encrypted email. For more information, see Legal entity virtual card fields. - Select Save & Continue.
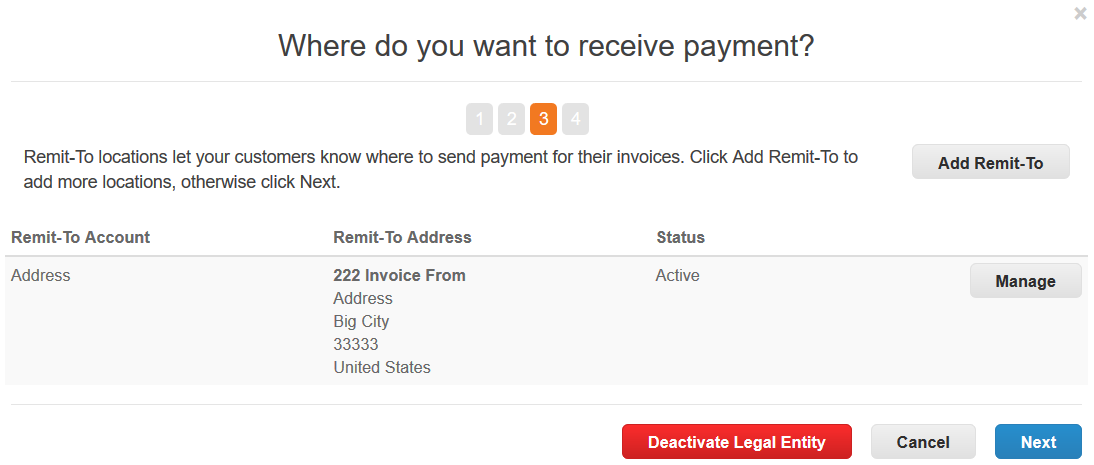
- The following screen summarizes your remit-to account details. You can select Add Remit-To to add an additional remit-to address or you can select Manage next to an existing remit-to to edit it. Once you are finished making changes, select Next.
- On the Where do you ship goods from? page, add your ship-from address, remit-to integration code, contact information, and the Coupa customers who can use this remit-to account. For field descriptions, see Tell your customers about your organization fields.
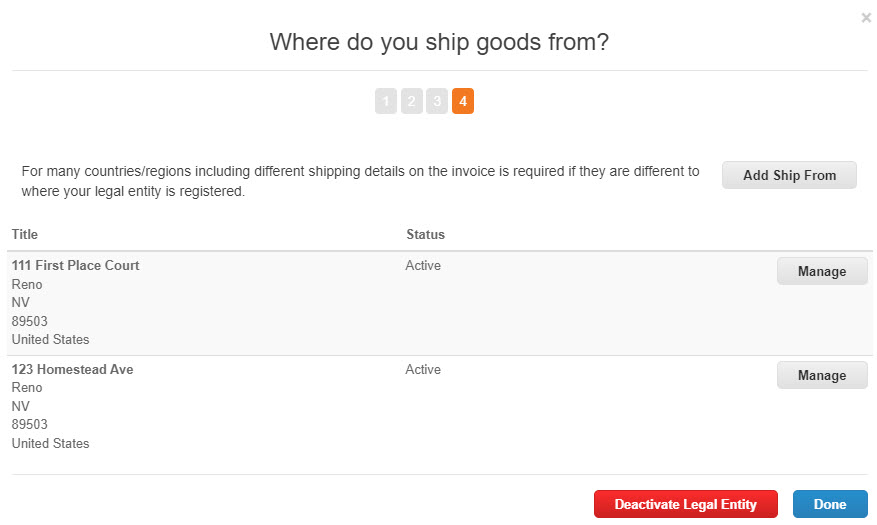
If you enabled the Use this for Ship From address option in step 3, the address is already populated. You can select Add Ship From to add an additional ship from address or you can select Manage next to an existing ship from address to edit it.
- Once you are finished making changes, select Done.
- The Setup Complete page confirms that your legal entity setup is complete and that you can use it on invoices. Select whether you'd like to go to Orders, Invoices, or Return to Admin or select Done to return to the Legal Entities page.
Modify legal entities
- Go to Setup > Admin > Legal Entity Setup.
- Next to the legal entity you want to modify, select Actions.
- You can select Manage Legal Entity, Manage Remit-To Accounts, and Deactivate Legal Entity.
Option Description Manage Legal Entity Opens the legal entity setup flow described in the Add a legal entity section. You can manage your addresses, but other information is not editable. Create a new legal entity if you need to modify more information. Manage Remit-To Accounts Opens the Add a new Remit-To account window where you can manage existing remit-to accounts or add new remit-to accounts. For more information, see View and Manage Remit-to Information.
NoteYou can also manage your remit-to information from the Setup > Admin > Remit-To page.
Deactivate Legal Entity Deactivates the legal entity so that it can't be used by you or your Coupa customer.
WarningThis action can't be undone. Check with your customer first to ensure that you don't have any interruption in einvoicing.
Tell your customers about your organization fields
| Field/Checkbox | Description |
|---|---|
| Which customers do you want to see this? | |
|
Customer list |
Select all or the specific customer(s) that you want to see your legal entity information. Customers that use Coupa for payments are marked with the Coupa Pay ( The statuses reflect your setup progress in your customer's instance (contact your customer for more information):
|
| What address do you invoice from? | |
| Address fields |
Enter the registered address of your legal entity. This is the location where you receive government documents and is sometimes this is called your address of record or registered company address. This section is required for you to einvoice your customers and is critical for compliance in some countries. Note
You can use the Use an existing address dropdown to select an address that your customer already has on file in their Coupa instance. The Use an existing address selector only displays addresses that match the legal entity's country/region. |
| Use this address for Remit-To | Selected by default. Uncheck if your Remit-To Address is different than the address you entered in the Address fields. When you deselect this option, you can select any address on the following Where do you want to receive payment? screen, regardless of country/region. |
| Use this for Ship From address |
Selected by default. Uncheck if your Ship From Address is different the address you entered in the Address fields or if you have more than one location. Tip
Include this information on the invoice when the addresses are different. For many countries, including this information is mandatory. |
| What is your Tax ID? | |
| Country/Region | Select your tax country/region from the dropdown list. If you select a different country than that of your legal entity (entered during step 3), you'll need to select a fiscal representation in this section. |
| Tax/VAT ID |
Enter the tax/VAT ID, including the prefix to the number (for example, GB1234567890). If you are exempt from tax registration in some regions/countries, select the I don't have TAX ID Number checkbox and enter your local tax ID or write N/A in the Local Tax ID field that appears. Tip
You can add more tax IDs by clicking on the Add additional Tax ID link. |
| Fiscal Rep | If you selected a different country than that of your legal entity in the Country/Region selector in this section, you need to designate a fiscal representative who is authorized to do business in that country/region on your behalf. For more information, see Add Fiscal Representatives. |
| I don't have a TAX ID Number |
Select the checkbox to add your local tax ID or write N/A in the Local Tax ID field. |
| Miscellaneous | |
| Invoice from Code | Tie your CSP invoice-from address (also known as your registered address) with the corresponding address in your ERP. |
| Preferred Language | Select your language from the dropdown list. |
Legal entity bank account fields
If you enabled the Use this address for Remit-to in step 3 of the legal entity creation process, your remit-to address is already completed. For more information, see Tell your customers about your organization fields.
For more information about account validations, see Supplier Remit-to Account Validations.
| Field/Checkbox | Description |
|---|---|
|
What are your Bank Account Details? |
|
| Bank Account Country/Region | Select the country from the drop-down list. By default, your legal entity country/region is selected. |
| Bank Account Currency | Select the currency from the drop-down list. By default, it is the currency of the bank account country/region. |
| Beneficiary Name | Enter the name of your beneficiary. By default, it is your legal entity name. |
| Bank Name | Enter the name of your bank. |
| Account Number | Enter your account number. |
| Confirm Account Number | Confirm your account number by entering it again. |
| IBAN | Enter your International Bank Account Number. |
| Confirm IBAN | Confirm your International Bank Account Number. |
| Routing (Bank Code) Number | Select one of the Routing Number (default), Bank Code, BSB, IFSC, Sort Code, or Transit Number and Institution Number fields and fill in the field next to it accordingly. |
| SWIFT/BIC Code | Enter your SWIFT/BIC code. |
| Bank Account Type | Type of the bank account: business or personal. |
| Supporting Documents |
Select Choose Files to upload up to five files (BMP, PDF, JPEG, PNG, TIFF, or GIF) that your customer can use to verify your banking information. If you want to replace the attachment(s) before saving, click Choose Files again and choose different attachments to upload, which replaces any existing attachments in the process. Note
After you save the legal entity, you cannot remove attachments. |
|
What is your Bank's Branch Address? |
|
| Address fields | Your bank's address. |
| What is your Remit-To Address? | |
| Address fields | Your remit-to address. You can use a saved remit-to address or enter a new address. |
| What is your Remit-To Integration Code? | |
| Code | Code used to associate this address in your customer's Coupa instance. |
|
Who is your Remit-To Contact? |
|
| Contact fields | Optional contact information for the remit-to address: name, email, phone number, fax number, and website. |
| Which customers can use this account? | |
| Customer list | Select the customers you want to be able to use this remit-to account. |
Legal entity virtual card fields
If you enabled the Use this address for Remit-to in step 3 of the legal entity creation process, your remit-to address is already completed. For more information, see Tell your customers about your organization fields.
| Field/Checkbox | Description |
|---|---|
| Virtual Card information | |
| Email Address | Enter the email address where you want to receive your virtual cards via encrypted email. |
| Process credit cards automatically? | Select if you want credit card payments to process automatically. If you choose this option, the Connect with Stripe button appears so you can connect your CSP account with your Stripe account. |
| What is your Remit-To Address? | |
| Address fields | Your remit-to address. You can use a saved remit-to address or enter a new address. |
| What is your Remit-To Integration Code? | |
| Code | Code used to associate this address in your customer's Coupa instance. |
| Which customers can use this account? | |
| Customer list | Select the customers you want to be able to use this remit-to account. |
Automatic payment processing with Stripe
If you want to process credit cards automatically using Stripe to receive credit card payments deposited into your Stripe connected account, then you can connect Stripe with the legal entity virtual card fields. For more details see: Touchless Credit Card Processing with Stripe.
Legal entity address fields
If you enabled the Use this address for Remit-to in step 3 of the legal entity creation process, your remit-to address is already completed. For more information, see Tell your customers about your organization fields.
| Field/Checkbox | Description |
|---|---|
| What is your Remit-To Address? | |
| Address fields | Enter your remit-to address. |
| What is your Remit-To Integration Code? | |
| Code | Code used to associate this address in your customer's Coupa instance. |
| Which customers can use this account? | |
| Customer list | Select the customers who can use this account. |
Didn't find what you were looking for? Upgrade to Premium Support today to unlock more support functionality.